How Long Does Spray Foam Take To Dry: A Comprehensive Guide
Discover Expert Advice On The Drying Time Of Spray Foam In Residential Homes And Commercial Buildings, What Affects It, And How To Ensure Safety.
- Understanding Spray Foam Insulation Types
- Open-Cell Spray Foam
- Closed-Cell Spray Foam
- Factors That Affect Spray Foam Drying Time
- Temperature
- Humidity
- Application Thickness
- Ventilation
- Typical Spray Foam Drying and Cure Times
- Open-Cell Spray Foam
- Closed-Cell Spray Foam
- High-Density Spray Foam
- The Science Behind Spray Foam Drying
- How to Speed Up the Drying Process
- Optimize the Environment
- Spray in Proper Layers
- Use Professional Equipment
- Schedule With the Weather
- Safety Considerations During Spray Foam Drying
- Ventilation Requirements
- Re-occupancy Timelines
- Health Concerns
- Protective Equipment
- Troubleshooting Common Drying Issues
- Incomplete Cure
- Slow Drying
- When to Call a Pro
- Superior Attic’s Spray Foam Process
- Professional Application Process
- Quality Assurance
- Guarantee and Safety Protocols
- Planning Your Spray Foam Project
Discover expert advice on the drying time of spray foam in residential homes and commercial buildings, what affects it, and how to ensure safety.
You just had spray foam insulation installed, now how long do you have to wait before you can use that space again? It’s a fair question, and the answer isn’t always simple.
According to the EPA, spray foam continues to release chemicals into the air during the curing process. These emissions, known as VOCs, can irritate your eyes, nose, and respiratory system. The CDC also warns that reentering a space too soon can pose health risks, especially for children, older adults, and anyone with asthma.
In this guide, we’ll explain the key factors that affect cure time and how professionals like Superior Attic manage insulation projects to ensure safety and long-term performance.
So, if you’ve been curious about how long does spray foam take to dry or want to avoid common mistakes with foam insulation, let’s dive right in!
Understanding Spray Foam Insulation Types
Different spray foam products cure at different speeds, and knowing what type was installed is the first step in understanding your drying timeline.
Spray foam insulation comes in two main types: open-cell spray foam and closed-cell spray foam.
Each is built for different jobs, and they don’t dry the same. As explained by the U.S. Department of Energy, both types have specific applications, timelines, and ventilation requirements that affect how they perform in real-world settings.
Open-Cell Spray Foam
Open-cell spray foam is soft, flexible, and expands quickly. It’s lightweight and air-permeable, which makes it a solid choice for indoor use in walls, ceilings, and attics. Because it uses water-based blowing agents, it dries faster than its closed-cell counterpart.
In most cases, open-cell foam becomes tack-free within seconds. Full cure time usually takes anywhere from 8 to 24 hours.
In humid climates, it may need an added vapor barrier to prevent moisture issues. It’s not a fit for crawlspaces, basements, or any area with consistent dampness.
Need help figuring out the right foam for crawlspaces or tough spots? Ourspray foam insulation service for crawlspaces and mobile homes covers all the bases.
Closed-Cell Spray Foam
Closed-cell spray foam is denser and forms a hard, rigid surface. It seals out moisture and adds structural support, which makes it a great option for basements, crawlspaces, roofing, and other exterior applications. For proper curing, it must be applied in thin layers—no more than 2 inches at a time.
After application, it’s typically tack-free within 30 to 60 seconds. Depending on temperature and humidity, full curing can take 24 to 72 hours. This type gives off a stronger chemical odor during curing, so good airflow is a must. That’s why ventilation requirements are stricter when working with closed-cell foam.
But even the best foam won't dry on time if the environment isn’t right. Let’s break down the biggest drying factors.
READ MORE: A Comprehensive Guide on Types of Attic Insulation
Factors That Affect Spray Foam Drying Time
No matter what type of foam you choose, it won’t cure properly unless the surrounding conditions are right.
Here are the four biggest factors that impact how fast spray foam dries and what can go wrong when they’re off.
Temperature
Spray foam is designed to cure best between 65°F and 85°F. If foam is sprayed at 55°F, expect delays and possibly soft spots that never fully harden.
On the other end, if the temperature climbs past 90°F, the outer shell may dry too fast while the inner layer stays gooey. This applies to both the air in the room and the surface you're spraying.
When the temperature’s wrong, you’re likely looking at slow cures or unstable foam—two common DIY spray foam risks.
Humidity
The ideal humidity range for spray foam curing is 40% to 60% relative humidity. If it’s too humid, say over 70%, moisture gets trapped in the foam, slowing down the cure and risking long-term performance issues.
But if humidity drops too low, the foam might harden too fast, becoming brittle and cracking over time. These temperature and humidity effects matter more than most people expect.
Application Thickness
Closed-cell foam has to be applied in layers of 2 inches or less. If someone sprays it too thick in one pass, internal heat can build up, causing shrinkage or an incomplete cure.

For example, applying a 4-inch layer at once can lead to the outside hardening while the center stays soft. Waiting too long between layers also adds hours or even a full day to your drying time.
Ventilation
Without airflow, the chemicals in spray foam can linger longer than expected. Proper ventilation clears out fumes and speeds up drying. The EPA recommends 10–20 air changes per hour when applying spray foam in enclosed spaces. If you skip this step, the foam may take much longer to cure, and the strong odor will stick around far too long.
If any of these variables are off, your spray foam won’t dry on time and might not cure correctly at all.
Typical Spray Foam Drying and Cure Times
Spray foam drying happens in stages. Just because it feels dry doesn’t mean it’s ready. Understanding the full spray foam curing process helps you plan your project and avoid safety issues.
Here’s the difference between each stage:
- Tack-free time means the surface is dry to the touch, usually within seconds to minutes.
- Full cure time is when the foam has completely hardened and finished its chemical reaction.
- Safe re-entry time is when it’s safe for people to return to the space without exposure to fumes or off-gassing.
Open-Cell Spray Foam
Open-cell spray foam dries fast thanks to its water-based blowing agent. It becomes tack-free in about 5 to 10 seconds and fully cures in 12 to 24 hours under normal conditions.
If ventilation is good, at least 20 air changes per hour, people can safely re-enter the area within 4 to 12 hours. Humid or cold weather may slow this down.
Products like those from Touch 'n Seal open-cell foam line are often used for interior spaces like attics and walls.
Want this done professionally? Superior Attic offers expert open-cell spray foam installation services with proper ventilation and cure-time monitoring to keep your home safe and efficient.
Closed-Cell Spray Foam
Closed-cell spray foam is denser and takes longer to cure. It typically becomes tack-free in 30 to 60 seconds, but full cure can take anywhere from 24 to 72+ hours, depending on temperature and how thick each layer is.
Safe re-entry usually ranges from 24 to 48 hours. This foam produces more VOCs (volatile organic compounds), so ventilation requirements are higher.
Each layer must be applied in 2-inch “lifts” with a wait time in between. For tough jobs like crawlspaces or basements, we provide closed-cell spray foam service to seal out moisture, improve energy efficiency, and add structural support.
High-Density Spray Foam
High-density spray foam is typically used for roofing and large-scale commercial jobs. It takes longer to fully cure—around 48 to 72+ hours—and is extremely sensitive to weather during installation.
It also requires a dry application window and is often paired with waterproofing products. These jobs usually need more scheduling prep and safety checks.
Here’s a quick breakdown to help you plan:
| Foam Type | Tack-Free Time | Full Cure Time | Safe Re-Entry |
|---|---|---|---|
| Open-Cell | 5–10 seconds | 12–24 hours | 4–12 hours |
| Closed-Cell | 30–60 seconds | 24–72 hours | 24–48 hours |
| High-Density | ~60 seconds | 48–72+ hours | 48+ hours |
Don’t risk walking in too soon. Know your foam’s real cure time.
Superior Attic ensures safe re-entry timing and full cure monitoring on every spray foam project.
Explore our spray foam insulation services
The Science Behind Spray Foam Drying
Spray foam works through a simple two-part chemical system. When isocyanate and polyol resin are mixed, they react and expand, creating foam that fills gaps, hardens, and insulates.
This process produces heat (a heat-producing chemical reaction) and releases gases called VOCs, which can affect indoor air quality during the early stages.
The foam may look firm on the outside, but inside, it’s still reacting. It’s hardening, sealing, and off-gassing. Just like concrete needs time to fully set, spray foam needs time to finish curing internally. Rushing this process can cause problems.
- Touching or pressing on uncured foam can weaken its structure
- VOCs are at their highest levels during curing and need proper airflow to clear out
- Once fully cured, the foam becomes stable and safe, but timing is critical
As the EPA explains in its safety guide for spray foam insulation, proper curing conditions and ventilation help protect both the structure and the people inside it.
That’s why Superior Attic’s trained technicians follow strict quality control standards at every stage. We prioritize safety, efficiency, and doing the job right the first time because rushing the cure isn't worth the risk.
So, how can you make sure your foam cures as quickly and safely as possible? Let’s look at ways to optimize drying.
How to Speed Up the Drying Process
Spray foam will cure on its own, but there are ways to help it dry faster and more reliably.
Most delays come from poor prep or bad conditions. These issues are easy to avoid with the right setup.
Optimize the Environment
The fastest way to help spray foam dry is to control the space it’s in. Keep the room between 65 and 85 degrees Fahrenheit—anything outside that range will slow the reaction.
If you’re working in a cold attic or unheated room, use a space heater to bring the temperature up, as long as it’s safe.
Humidity matters too. You’ll want to keep relative humidity under 60 percent, so a dehumidifier can help.
Airflow is also key. Fans and ventilation systems help gases escape and support a cleaner, faster cure.
Spray in Proper Layers
Spray foam has limits. For closed-cell foam, each pass should be no more than two inches thick. After spraying one layer, you need to wait 5 to 15 minutes before applying the next. If you skip that pause, you risk trapping heat and gas inside the foam, which causes soft spots and shrinkage.
Open-cell foam is a bit more forgiving, but even then, spraying too much at once can slow things down. Giving the foam a chance to rest between passes helps it dry stronger and more evenly.
Use Professional Equipment
At Superior Attic, we use spray rigs that heat the foam material to the ideal temperature, usually between 120 and 140 degrees Fahrenheit, before it’s applied. This helps it bond properly and cure consistently.
DIY kits don’t offer that kind of control. Most aren’t powerful enough to handle full attic applications, and they lack safety checks like temperature monitoring or ventilation detection. Our team is trained to spot problems before they start, whether it’s air that’s too damp or a surface that’s too cold.
How much does spray foam installation cost? Find out here
Schedule With the Weather
If your project is outdoors or on the roof, weather makes a big difference.
Foam should never be applied just before or during rain. Wet surfaces weaken adhesion and slow the cure. In cold conditions, we preheat the surfaces before spraying to make sure the foam sticks and sets the way it should.
And here’s one mistake we see too often: spraying extra foam. This won’t help it dry faster. In fact, it does the opposite. It slows the process and risks long-term performance.
By planning right and using the right tools, Superior Attic keeps drying time short and results strong without cutting corners.
Safety Considerations During Spray Foam Drying
Spray foam creates a high-performance thermal seal, but during the drying process, it can release chemicals that affect indoor air quality. If you're staying in the home or nearby during the install, it’s important to know what’s safe and what’s not.
Let’s walk through the key safety concerns to keep in mind while spray foam is curing.
Ventilation Requirements
Ventilation is the number one priority during and after spray foam application. It helps clear out VOCs and chemical odors that are released as the foam cures.
Professional crews typically target 10 to 20 air changes per hour (ACH) to keep air clean and safe. In enclosed spaces like attics or crawlspaces, cross-ventilation with fans or negative air machines is used to move air out quickly and efficiently.
Re-occupancy Timelines
Even if the foam feels dry to the touch, that doesn’t mean it’s safe to breathe in the space yet. For open-cell spray foam, safe re-entry is usually possible after 4 to 12 hours, assuming good airflow.
Closed-cell foam takes longer, typically 24 to 48 hours, depending on how well the area is ventilated. Always follow the product manufacturer's instructions. Skipping this step puts you at risk of exposure while VOCs are still in the air.
Health Concerns
Research from a study published by the Centers for Disease Control and Prevention (CDC) warns that VOC exposure during the curing process can lead to a range of health effects. These include:
- Eye, nose, or throat irritation
- Headaches, dizziness, or nausea
People with asthma, children, and the elderly are especially vulnerable. You don’t have to be handling the foam to feel the effects. Just being in the space too early can be dangerous.
READ MORE: Expert Insights on How Often You Should Replace Your Attic Insulation
Protective Equipment
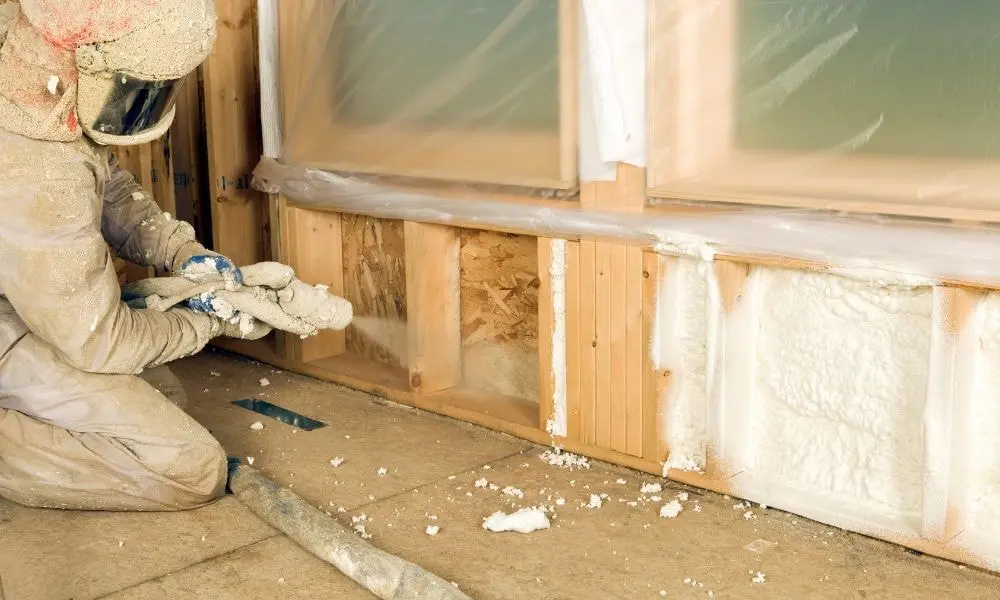
During installation, professionals wear full PPE such as respirators, gloves, goggles, and protective suits to avoid contact with uncured chemicals. Many DIYers skip this essential gear, which increases the risk of chemical exposure.
This is why Superior Attic uses trained, properly equipped professionals for every spray foam job. We protect both your home and your health by following proven safety protocols from start to finish.
Troubleshooting Common Drying Issues
Even with the right foam and professional spray foam application, the curing process doesn’t always go to plan. Here’s how to recognize and resolve common issues before they become long-term problems.
Incomplete Cure
If the foam still feels soft or tacky after the expected cure time, you’re likely dealing with an incomplete cure. This can be caused by low temperatures, high humidity, or poor mixing during application.
You might notice:
- Foam that's gray or brown instead of uniform yellow or white
- Bubbling, sagging, or a strong lingering odor
- Closed-cell foam that feels spongy even after 48 hours
To avoid this, make sure conditions meet the recommended range before and during application. Don’t rush layering. If this happens after installation, a professional may need to remove the bad foam and reapply it correctly.
Slow Drying
When foam takes longer than expected to dry, these are the usual suspects:
- It was sprayed in cold weather
- The layers were applied too thick
- There’s not enough ventilation, or the airflow is blocked
Pro tip: Even good foam can fail if conditions aren’t right. Always monitor temperature, humidity, and airflow during curing. Adjusting the environment early on can save you days of frustration later.
When to Call a Pro
Some problems are best left to the experts. Contact a professional if:
- Foam hasn’t fully cured after 72 hours
- There’s a persistent chemical smell that won’t clear
- You suspect the foam was sprayed too thick, too fast, or under the wrong conditions
Superior Attic offers on-site assessments and insulation remediation for poorly installed foam jobs, whether we installed it or not. We’re here to help fix what others may have missed.
Now that you understand the drying process and how to spot problems, here’s how Superior Attic ensures success every time.
Superior Attic’s Spray Foam Process
When you hire Superior Attic, you’re getting a system built on experience, training, and a clear process. Every step is designed to keep your home safe, efficient, and up to code.
Here’s what it looks like behind the scenes.
Professional Application Process
Our team begins each spray foam job with a full site assessment. We inspect the area, measure surface temperatures, check humidity levels, and plan for safe ventilation.
Once everything is confirmed, we use temperature-controlled spray rigs to apply the foam in proper lifts, monitoring for even coverage and consistent texture. Whether it’s open-cell or closed-cell, we adjust for the material type, location, and drying conditions in real time.
Quality Assurance
Every technician at Superior Attic is trained in curing protocols and proper PPE use. After the foam is applied, we inspect the surface to confirm adhesion and foam integrity.
If anything looks off, we fix it right then, not after the fact.
Homeowners get re-entry guidelines in writing, along with a full walkthrough of what to expect over the next 24 to 72 hours. We also follow up after the job to make sure everything cured as planned and you’re satisfied with the results.
READ MORE: How Insualtion Affects Home Resale Value
Guarantee and Safety Protocols
All spray foam jobs are backed by our installation guarantee, giving you peace of mind long after we leave. We also provide safety guides at the time of service, outlining when it’s safe to return and how to keep ventilation running smoothly.
And if you ever have questions, concerns, or suspect a problem, we’re available for follow-up inspections and support.
Now that you’re fully informed about the spray foam curing process and what can go wrong, you’ll be better prepared to make the right decisions.
Planning Your Spray Foam Project
Ready to move forward with spray foam insulation? Superior Attic offers free consultations to help you understand what your space needs and how the process works.
Whether you're insulating a new area or replacing old material, our team walks you through every step from selecting the right foam to ensuring proper curing and ventilation.
We handle the details, follow strict safety protocols, and keep you informed from start to finish. Our technicians are trained, our equipment is professional-grade, and our work is backed by a satisfaction guarantee.
You don’t need to guess or go it alone. If you’re in the Dallas-Fort Worth area, we’re ready to help.